
Why Stabilization Demands Its Own Testing Protocol
Lime and cement stabilization fundamentally alter the engineering properties of a subgrade soil. When calcium-based stabilizers react with clay minerals, they drive cation exchange, flocculation, and — over time — pozzolanic cementation. The result is a material that behaves less like a plastic clay and more like a weakly cemented base. Because the chemistry is real, the testing that governs acceptance cannot simply borrow from conventional earthwork practice. A field technician who pulls out the raw-soil Proctor curve and expects it to apply to a lime-treated mix is going to produce compaction data that leads to either over-rolling or a failed strength test.
Our materials testing services cover stabilized subgrade work across a wide range of project types — highway reconstruction, site development, commercial parking, and industrial yard stabilization. The testing sequence for any of these projects follows the same logical arc: characterize the soil, determine the stabilizer dosage, verify mixing quality, establish the treated-material compaction target, compact to that target in the field, and confirm strength gain through unconfined compression. Every one of those steps is a distinct testing event, and every one has a governing standard or specification requirement. This guide walks through each step in order, with the numbers that matter in practice.
For Texas projects that reference TxDOT Standard Specifications, two items dominate stabilized subgrade work: Item 260 (Lime Treatment — Materials) and Item 275 (Cement Treatment — Materials). Where relevant, we will note the specific requirements each item imposes on testing, because the failure modes differ between lime and cement — not just in chemistry but in what the inspector is watching for on any given day.
Soil Characterization Before You Order Stabilizer
Before the stabilizer percentage can be selected, the lab needs to know what it is stabilizing. At minimum, that means Atterberg limits (ASTM D4318), a grain-size distribution with hydrometer if significant fines are present (ASTM D7928), and a natural moisture content. For lime stabilization to work efficiently, the soil typically needs a plasticity index (PI) above about 10 — highly plastic clays are actually good candidates, which is why lime stabilization is so common in the expansive clay belts of Central and East Texas. Very low-PI or sandy soils are better candidates for cement or fly-ash treatment.
Sulfate content testing is critical and frequently skipped, particularly in South and West Texas where naturally occurring sulfates are common. When lime is added to a soil containing soluble sulfates above roughly 2,000 ppm (with thresholds varying by specification), the risk of ettringite formation — a sulfate-alumina-calcium compound that expands as it crystallizes — increases dramatically. Ettringite heave can destroy a treated subgrade from beneath within months of construction. The Texas Department of Transportation has specific guidance on sulfate testing, and many local agency specifications now require it before lime is specified. If elevated sulfates are found, the stabilization approach must be reconsidered before any lime is applied.
Organic content is another disqualifier. High organic matter can suppress the pozzolanic reaction and prevent pH from rising to the level needed for stabilization to proceed. A simple organic content determination by loss on ignition, or a field observation of high organic odor and very dark color, should trigger a conversation about whether lime treatment is appropriate at all.
The Eades-Grim pH Test and Lime Stabilized Subgrade Testing Dosage
The Eades-Grim pH test, codified in ASTM D6276, is the standard method for selecting the minimum lime content needed to stabilize a given soil. The principle is straightforward: lime in solution is strongly alkaline, and when added to a reactive clay, the clay minerals consume calcium and hydroxyl ions. The pH of the lime-soil mixture drops below the pH of pure lime (approximately 12.4) until enough lime has been added to saturate the exchange capacity of the clay. Once that threshold is crossed, additional lime keeps the pH at or near 12.4, indicating that stabilization chemistry can proceed.
In practice, we prepare a series of soil-lime mixtures at incrementally increasing lime percentages — commonly 2 %, 3 %, 4 %, 5 %, 6 %, and sometimes higher for very active clays — mixed with distilled water and allowed to react for one hour at 25 °C before pH measurement. The lowest lime percentage that produces and sustains a pH of 12.4 is the minimum stabilizing lime content. Designers typically add one to two percentage points above that minimum for field conditions, compaction variation, and long-term durability. The test costs relatively little compared to the material itself, and skipping it in favor of a rule-of-thumb percentage is a false economy.
For cement-treated subgrade governed by TxDOT Item 275, the dosage selection follows a different path — typically based on UCS targets rather than pH. The design cement content is the lowest content that produces the required 7-day UCS in laboratory-molded specimens. The two approaches reflect the different modes of action: lime works primarily through ion exchange and slow pozzolanic gain, while cement hydrates rapidly and predictably regardless of clay mineralogy, which is why cement is also used on lower-PI soils where lime would be ineffective.
Mellowing: The Waiting Period That Changes the Material
After lime is spread and initially mixed with the subgrade soil, most specifications require a mellowing period before final pulverization and compaction. TxDOT Item 260 requires the contractor to allow the lime-soil mixture to mellow for a period specified in the plans — typically a minimum of 24 hours, though 48 to 72 hours is common in practice for highly plastic clays. During mellowing, the lime drives cation exchange and begins breaking down clay aggregations, making the soil friable and easier to pulverize to the required gradation. The PI of the soil measurably drops during this window.
From a testing standpoint, mellowing is a scheduling constraint that affects when the pulverization check and final compaction can begin. Field logs must record the time and date of initial lime application and mixing so that the mellowing interval can be verified. On projects where the inspector is spread thin, this documentation step is easy to let slip — and equally easy for the engineer of record or TxDOT project engineer to flag during a records review. We keep timestamped field logs on every stabilization project specifically to close that gap.
Cement treatment does not include a mellowing period. In fact, the opposite constraint applies: once cement contacts moisture, hydration begins, and the window for mixing, shaping, and compacting closes. TxDOT Item 275 typically limits the time between cement application and final compaction to no more than two hours. This means cement stabilization projects require tighter equipment staging and cannot tolerate the delays that lime work accommodates. The inspector's job on a cement project is to watch the clock and the weather, not to schedule a rest period.
Pulverization: Verifying the Gradation Requirement
One of the most commonly under-inspected steps in lime stabilization is the pulverization check. After mellowing, the contractor re-mixes and pulverizes the soil-lime layer with a reclaimer or rotary mixer. The specification sets a gradation requirement on the resulting material — not on particle size of the original soil, but on the size of the clods and aggregations after mechanical processing. TxDOT Item 260 typically requires that 100 % of the material pass a 1½-inch sieve and that at least 60 % pass the No. 4 sieve, excluding gravel and stone particles.
Checking this requires pulling a sample from the processed material, spreading it on the appropriate sieves, and recording the percentages. The material is moist and clumped, so the sieve analysis is done by hand separation and visual assessment rather than by the washing and mechanical shaking used for aggregate gradation. When pulverization is inadequate, the material compacts unevenly: the interior of large clods can remain at low density even when the matrix around them passes a nuclear gauge reading. Uneven density translates to differential settlement and, in pavement applications, longitudinal cracking.
If the pulverization check fails, the fix is additional passes with the reclaimer — not more lime, not extended mellowing at that stage. Additional lime introduced after the initial mixing and mellowing phase creates inconsistent chemistry through the depth of the lift. When we see pulverization failures, the most common root cause is the contractor moving too quickly from mellowing to final mixing, particularly in dry weather when the soil surface dries out and re-hardens before the reclaimer makes its passes.
For cement treatment, pulverization is equally important but the urgency is greater because of the two-hour window. Contractors sometimes under-pulverize in an effort to finish compaction before the cement sets, which simply trades one failure mode for another. The specification does not offer that compromise.
Moisture-Density Testing on Treated Material
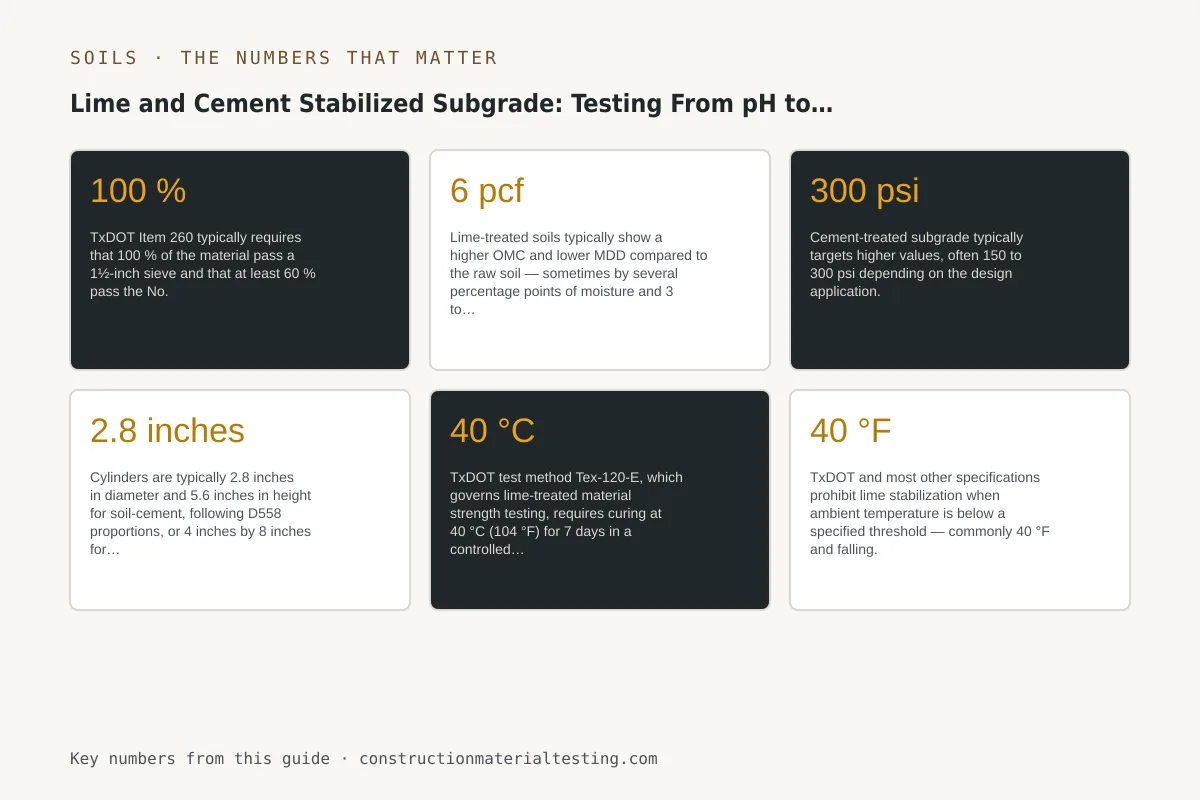
This is the point where the most common error in stabilized subgrade testing occurs. A Proctor curve developed on the raw soil does not apply to the lime-treated or cement-treated material. The stabilizer changes the specific gravity, the capillary behavior, and the plastic-to-dry transition of the soil, all of which shift the optimum moisture content (OMC) and maximum dry density (MDD). Lime-treated soils typically show a higher OMC and lower MDD compared to the raw soil — sometimes by several percentage points of moisture and 3 to 6 pcf of density. Using the raw-soil curve as the compaction target leads to over-moistening the field material in an attempt to reach an OMC that no longer applies to the treated mix.
For lime-treated subgrade, the standard governing the moisture-density relationship is typically ASTM D698 (Standard Proctor) or its modified equivalent (ASTM D1557), depending on the design specification. TxDOT Item 260 references a moisture-density test on the treated material using a specified method; many county and local agency specs default to Standard Proctor. For cement-treated material, ASTM D558 — the standard specifically written for soil-cement — is the appropriate test, and our laboratory runs this as well through our ASTM D558 test method. D558 uses a slightly different compaction procedure than D698 and produces results that are more representative of how soil-cement behaves under compaction energy.
The treated-material Proctor must be run on a sample that has been mixed at the design stabilizer percentage and allowed to react for a specified period before compaction — typically one hour. If the Proctor is run immediately without reaction time, the curve will be artificially high in density and will not represent what happens in the field after the material has reacted and stiffened. Getting the laboratory procedure right is what makes the field compaction target defensible.
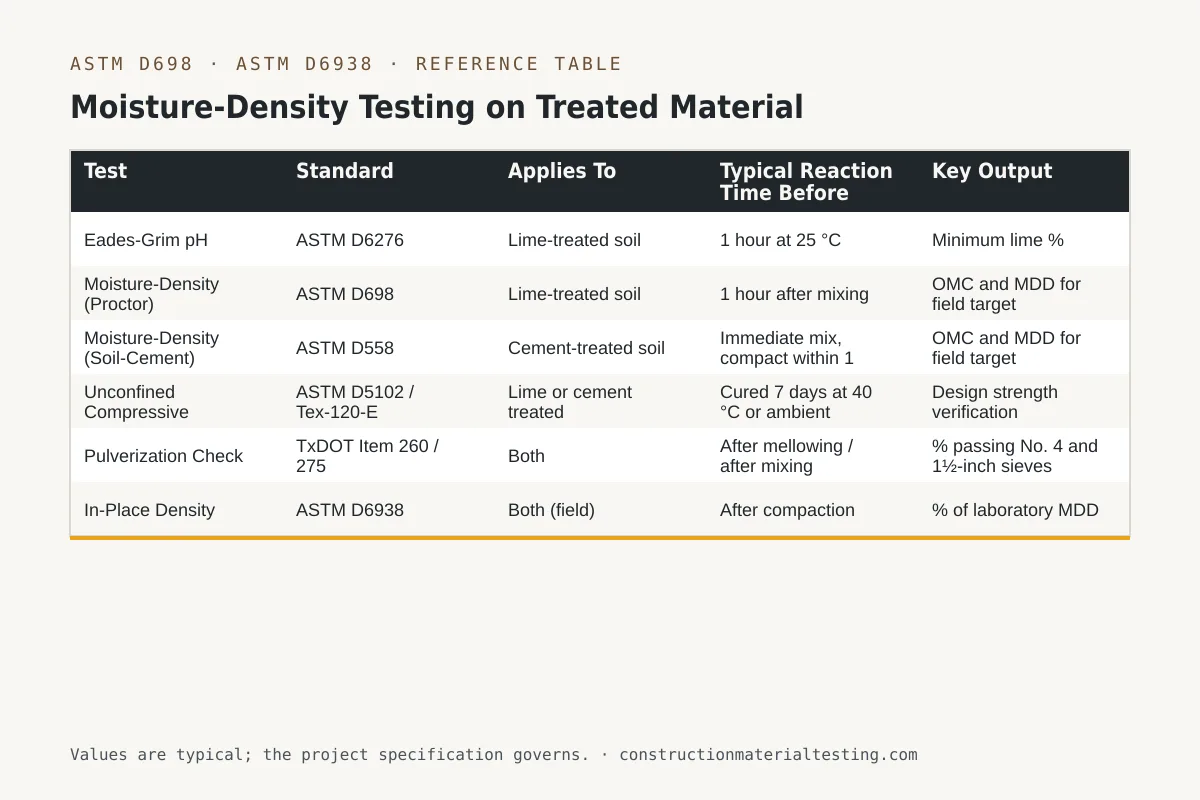
| Test | Standard | Applies To | Typical Reaction Time Before Compaction | Key Output |
|---|---|---|---|---|
| Eades-Grim pH | ASTM D6276 | Lime-treated soil | 1 hour at 25 °C | Minimum lime % |
| Moisture-Density (Proctor) | ASTM D698 | Lime-treated soil | 1 hour after mixing | OMC and MDD for field target |
| Moisture-Density (Soil-Cement) | ASTM D558 | Cement-treated soil | Immediate mix, compact within 1 hour | OMC and MDD for field target |
| Unconfined Compressive Strength | ASTM D5102 / Tex-120-E | Lime or cement treated | Cured 7 days at 40 °C or ambient | Design strength verification |
| Pulverization Check | TxDOT Item 260 / 275 | Both | After mellowing / after mixing | % passing No. 4 and 1½-inch sieves |
| In-Place Density | ASTM D6938 | Both (field) | After compaction | % of laboratory MDD |
Field Compaction Verification With the Nuclear Gauge
Once the treated-material Proctor has established the MDD and OMC for the mix, field compaction is verified against those values using a nuclear moisture-density gauge under ASTM D6938. The gauge is placed directly on the treated layer, and both density and moisture content are read. The reported dry density is divided by the laboratory MDD to produce a percentage of compaction, which must meet the specification minimum — most Texas highway and local agency specs require 95 % of the laboratory MDD for stabilized subgrade, though some structural applications require 98 %.
There is a calibration consideration unique to stabilized layers: the nuclear gauge uses attenuation of gamma radiation to estimate density, and the presence of calcium (from lime or cement) can influence the read. When gauge readings seem consistently high relative to sand cone checks or feel inconsistent, we run a correlation with ASTM D1556 (sand cone) or ASTM D2167 (rubber balloon) to verify the gauge response on that specific mix. This is more common on cement-treated material, where calcium concentrations are higher. The gauge manufacturer's guidance on calcium-bearing soils should always be consulted for high-cement-content mixes.
Frequency of testing is set by the specification. TxDOT typically requires one density test per 2,000 square yards per lift, with the specific frequency documented in the project Special Provisions. Local agency and private project specifications vary. Our field teams log location coordinates for every test so that a spatial pattern of passing and failing areas can be identified quickly — a row of failing tests along one pass of the reclaimer usually points to a machine calibration or depth issue, not a random compaction problem.
Unconfined Compressive Strength Cylinders
Strength verification through unconfined compressive strength (UCS) testing is the endpoint quality check for both lime and cement stabilization. Cylinders are molded in the field or laboratory, cured under specified conditions, and then loaded to failure. The failure stress — the UCS — is compared to the design minimum, which for lime-stabilized subgrade in Texas practice is commonly 50 psi at 7 days, though project-specific values vary. Cement-treated subgrade typically targets higher values, often 150 to 300 psi depending on the design application.
Molding procedure matters. Field-molded cylinders should be compacted at the field moisture content and to a density that corresponds to the compaction achieved in place. If cylinders are molded wetter or drier than field conditions, the strength result is not representative of the in-place material. Cylinders are typically 2.8 inches in diameter and 5.6 inches in height for soil-cement, following D558 proportions, or 4 inches by 8 inches for larger-aggregate mixes. After molding, cylinders are sealed in plastic bags to prevent moisture loss and transported to the laboratory.
Curing protocol is where field teams frequently introduce error. TxDOT test method Tex-120-E, which governs lime-treated material strength testing, requires curing at 40 °C (104 °F) for 7 days in a controlled environment. This accelerated cure is intended to simulate longer-term ambient curing and to produce results in a timeframe compatible with construction schedules. If cylinders are left in a job trailer for two days before reaching the laboratory — exposed to whatever temperature exists in the trailer — the curing clock has already started under uncontrolled conditions, and the result may understate or overstate the actual strength. We transport cylinders to the laboratory promptly and document the chain of custody including transit temperature when feasible.
When UCS results come back low, the investigation follows a logical path: Was the stabilizer percentage actually delivered at the design dosage? Was pulverization adequate? Was the mix moisture content in range? Were the cylinders cured correctly? Low UCS rarely has a single cause; it is usually the compounding of small errors across the mixing, compaction, and curing steps. Retesting with fresh field samples after the contractor has corrected the suspected deficiency is the appropriate response, not averaging the low result away.
TxDOT Items 260 and 275: Specification Requirements at a Glance
TxDOT Item 260 governs lime treatment of subgrade and base materials on state highway projects. It specifies lime type (hydrated lime is standard, quicklime is allowed under certain conditions), application rate verification, water addition for slurry or dry application, mellowing requirements, pulverization standards, compaction requirements, and final surface tolerance. The item also requires the contractor to submit a mix design — including the Eades-Grim result and treated-material Proctor — before beginning work. Engineers and owners on TxDOT-administered projects should confirm that these submittals are in the project file before the first lime truck arrives on site.
TxDOT Item 275 governs portland cement treatment. Key differences from Item 260 include the two-hour compaction window after cement contact, the requirement that the mixing equipment be capable of processing the full design treatment depth in a single pass, and the specification that the treated surface be kept moist (cured) for a period after compaction — typically 72 hours minimum — to prevent shrinkage cracking and surface scaling. Curing is often accomplished with a water truck making repeated passes or with a curing compound applied to the finished surface. Curing documentation should be part of the inspector's daily report.
Both items reference the TxDOT Standard Specifications and may be supplemented by project Special Provisions that tighten or modify the base specification. On any TxDOT project, the Special Provisions govern when they conflict with the standard item. Reading both documents before the pre-construction meeting is not optional for the testing firm's field supervisor — surprises during production are costly for everyone.
| Requirement | TxDOT Item 260 (Lime) | TxDOT Item 275 (Cement) |
|---|---|---|
| Stabilizer type | Hydrated lime or quicklime | Portland cement (Type I or II) |
| Mellowing period | 24–72 hours minimum (per plans) | None — hydration begins at contact |
| Compaction window | No strict limit post-mellowing | Within ~2 hours of cement contact |
| Pulverization — % passing No. 4 sieve | ≥ 60 % (excluding rock) | ≥ 60 % (excluding rock) |
| Pulverization — % passing 1½-inch sieve | 100 % | 100 % |
| Compaction standard | Treated-material Proctor (D698 or equivalent) | D558 moisture-density relationship |
| Minimum compaction | 95 % of MDD (typical) | 95 % of MDD (typical) |
| Strength test method | Tex-120-E (7-day UCS at 40 °C) | Tex-120-E or project-specified |
| Curing after compaction | Keep moist for first 24 hours (typical) | Moist cure or compound, 72 hours minimum |
Edge Cases and Common Problems in the Field
Rain events between lime application and final compaction are the most disruptive field condition on a stabilization project. Light rain during mellowing is generally not a problem — the lime-treated soil is already wet and the reaction continues. Heavy rain that saturates the material and ponding on the treated surface can leach lime and dilute the mix. When this happens, the pulverization check after re-mixing often shows adequate processing, but a pH check on the rewetted material will reveal whether the lime concentration is still sufficient. We carry a field pH meter on stabilization projects specifically for this situation. If pH has dropped below 12.4, additional lime must be blended in and documented.
Cold temperatures slow the pozzolanic reaction significantly. Below about 40 °F (4 °C), lime stabilization effectively stops gaining strength, and at near-freezing temperatures, freezing of the freshly compacted layer can disrupt the matrix before initial strength develops. TxDOT and most other specifications prohibit lime stabilization when ambient temperature is below a specified threshold — commonly 40 °F and falling. This is not a conservative interpretation; it reflects the chemistry. Contractors who push forward in cold weather in an attempt to stay on schedule frequently produce in-place material that fails the UCS requirement at 7 days regardless of how well everything else was done.
Depth of treatment is a recurring discrepancy between design and field. The plans may call for 8 inches of treatment, but the reclaimer drum depth setting, the pre-scarification depth, and the actual lift thickness all interact. We check treatment depth by probing with a rod immediately after mixing and before compaction — the treated zone is visibly lighter in color and softer in texture than the underlying untreated soil, and the transition is usually sharp enough to measure. If the treated depth is consistently less than specified, the compacted-layer density is correct but the structural contribution is less than designed, which is a structural deficiency, not simply a compaction failure.
Variability in lime content through the width of a treated lane is another issue that testing can reveal. If the lime spreader makes overlapping passes with inconsistent overlap, some areas receive double the design rate and some receive little or none. The double-lime areas may show excessive shrinkage cracking; the under-limed areas will fail UCS. A grid of pH checks across the fresh-mixed surface before mellowing can catch this early, when the contractor can still add supplemental lime or remix the deficient areas without losing the mellowing window. This kind of proactive testing does not always appear on inspection plans, but it saves significant rework.
Where This Fits on Your Project
Lime and cement stabilized subgrade testing is not a single-event inspection — it is a sequence of tests that begins in the laboratory before the project starts and continues through field density and strength verification after compaction. Missing any step in that sequence creates a gap in the documentation that cannot be reconstructed after the fact. Whether your project is governed by TxDOT Items 260 and 275, local agency specifications, or a private engineer's specification, the testing protocol we have described here covers the data your engineer of record needs to confirm the subgrade will perform as designed. Our Houston-area soils and materials testing team and our network of regional dispatch hubs are positioned to support pre-construction mix design through final compaction acceptance. If you are planning a stabilization project and want to discuss the testing scope, submit a proposal request and we will respond with a testing plan matched to your specification requirements.
Get our guides in your Google results
Add Construction Materials Testing as a preferred source and Google shows our guides more often when you search for testing topics.